Introduction - Data management
Welcome to the data management lab. In the lecture we briefly covered the complexity of working with data on a computer and talked a bit about the inner workings of our cluster's filesystem. Here you'll learn best practices for keeping, processing and sharing the data you work with.
Let's play through a scenario...
A colleague from an overseas university has concluded with their experiments and would like to share the data they have gathered with You, the foremost expert in High Performance Computing they know. An account on your local HPC center's SFTP server has been created for them and they have been lovely enough to upload their data to it.
By and large your tasks in this scenario would then be as follows:
- Transfer the data from the SFTP server to your project/work space
- Run computations on the data
- Share your results with your overseas colleague
We'll cover the first topic in depth in this lab and the second topic in next week's lab.
Data transfer between different parts of the cluster
As stated above, your local HPC center (that's us) have been helpful enough to set up an SFTP account for you and your imaginary colleague to use. For the regular user, the SFTP server is located on the address sftp.hpc.ut.ee and appears to be a completely separate entity. In actuality, it is just part of a file-set (under /gpfs/terra/export/) on our terra filesystem, that we have made accessible through the SFTP protocol. As it can be accessed from outside the university network and supports a variety of different data transfer methods, it has become one of the main gateways for sharing data with people working outside of the University of Tartu.
Downloading data onto the cluster
As the name would suggest, our SFTP server supports the SFTP or Secure File Transfer Protocol (also known as the SSH File Transfer Protocol). More info about the tool can be found here, but in this practical we will mainly be using the commands in the following 'Info' box
Info
sftp [username]@[remote hostname or IP address] - Establish an interactive session with a remote SFTP server.
ls [options] [path] - Display the listing for the directory located at [path] on the remote server. Uses the ls command options.
lls [options] [path] - Display the listing for the directory located at [path] on the local system. Uses the ls command options.
cd [path] - Change the directory on the remote server to [path].
lcd [path] - Change the directory on the local system to [path].
get [remote path] [local path] - Transfer a file or directory from [remote path] on the remote server to [local path] on the local system.
put [local path] [remote path] - Transfer a file or directory from [local path] on the local system to [remote path] on the remote server.
You might have noticed a file has appeared in the course root directory. In that file, you'll find the username and password required to log in to the course SFTP account.
Complete
- Create a few directories. One named
lab3in your course home directory (/gpfs/space/projects/hpc-course/hpc_username/), another namedyour_hpc_usernamein/gpfs/space/projects/hpc-course/lab3_collaband a final one namedshared_workdirin/gpfs/space/projects/hpc-course/lab3_collab/your_hpc_username/. All of this lab's tasks will take place in these directories. Now, move tohpc_username/lab3/. - While in the
lab3directory, use the commands provided in the 'Info' box to log in to the SFTP server using the provided credentials. Take a second to explore and familiarise yourself. Note that although you are now in a session with a remote machine which resembles the ssh session you are hopefully growing somewhat accustomed to, locally (or on the cluster, rather) you are still simultaneously in thelab3directory. - Download the data archive located in the
filesdirectory on the SFTP server into yourlab3directory and exit the session withCtrl + dor entering the commandquit.
You might notice that the file you've downloaded has a .tar.gz extension. While file extensions are less important in Linux in terms of a file's function or type, they do provide an element of human-readability. In the current case, from the extension .tar.gz we can deduce that the file is a tar archive (an archive file containing a collection of other files) that has been compressed with the gzip utility. It is also not uncommon for the compressed tar archive to contain other compressed files in turn.
Complete
Un-tar the downloaded archive
tar xzvf data_for_sharing.tar.gz
Moving on with the story, now that we have our data to analyze present and unpacked in our home directory, we realize two things: first, that we need the help of one of our colleagues for the analysis, and second, that the data is sensitive in nature. Thus, to make sure only the necessary people can access it, we need to take a look at the permissions of our home directory and the collaboration directory we created earlier. (it is best to keep your home directory's permissions secure in any case, but it is critical when handling sensitive data).
Messy permissions
Info
A reminder about permissions:
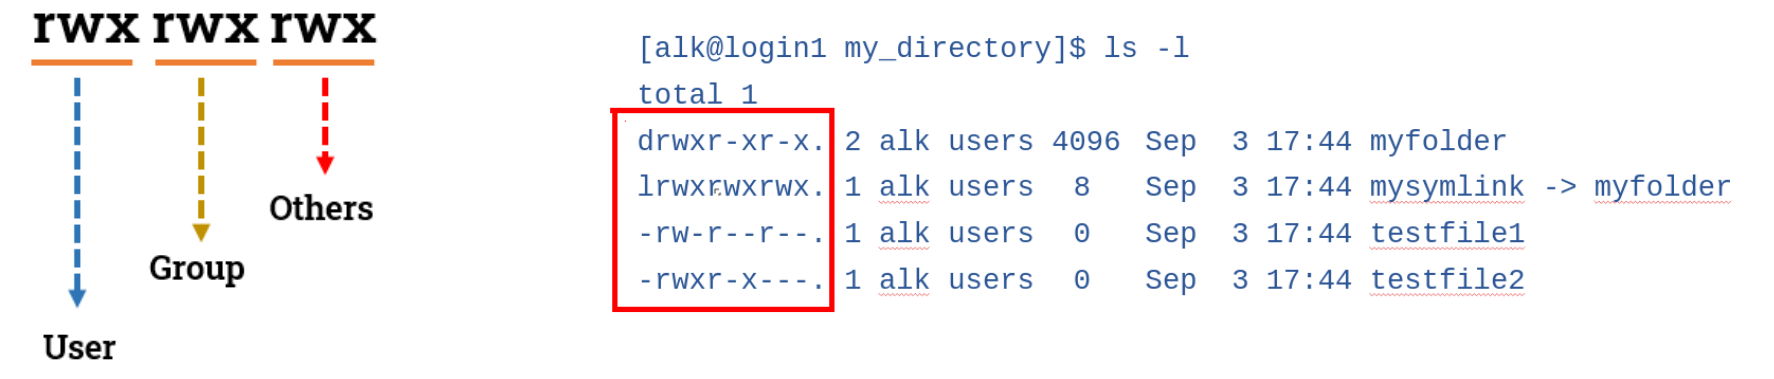
- The first character denotes the type of the inode - 'd' for directory, 'l' for link, 's' for socket and a dash (-) for a file
- The next nine characters are grouped into sets of 3, each denoting a permission class
- The first class denotes the permissions of the user of the inode, commonly known as the owner
- The second class sets the permissions for the group
- The last class applies to everyone else - others
NB! The execute permission is a bit special. This permission is very different on directories compared to files. Essentially, you can think of it as providing access to the directory. Having execute permission on a directory authorizes you to look at extended information on files in the directory (using ls -l, for instance) but also allows you to change your working directory (using cd) or pass through this directory on your way to a subdirectory underneath. Lacking execute permission on a directory can limit the other permissions in interesting ways. For example, how can you add a new file to a directory (by leveraging the write permission) if you can't access the directory's metadata to store the information for a new, additional file? You cannot. It is for this reason that directories generally have execute permission for one or more of the user owner, group owner, or others.
To gain a bit of experience playing around with permissions, we have created for you a simple task - "fix" the permissions on a directory tree.
First, you make a copy of the directory structure
This is a perfect use case for rsync, copy the directory /gpfs/space/projects/hpc-course/permissions_mess under your lab3 directory.
rsync -av /gpfs/space/projects/hpc-course/permissions_mess lab3/
Then, you have to initialize the messy permissions with a script called init_permission_mess.sh you can find under hpc-course/scripts/
Attention
Should you run random scripts given to You by a stranger? It is good policy to always examine the contents of the script before you execute it
After examination that it is not malicious, feel free to run it using
bash /gpfs/space/projects/hpc-course/scripts/init_permission_mess.sh
You see some output that lets you know that the script has finished. You can run it multiple times, but this will break the checks in our scoring system, so if that happens, feel free to delete the whole lab3/permissions_mess/ directory and re-run the script.
Hint
If you get stuck with permission denied errors, try giving yourself the permissions to modify the contents first
Complete
The goal is simple. Using tools like find, chmod, chgrp and other commands, guarantee the following:
- Everything in the directory named
permissions_messbelongs to the etais organization grouphpc_org_2c1ccd6685a24b4bab573a3797bbd56d - The main directory is writable and readable for you, readable for the group and has no permissions for others
- All directories under
permissions_messthat are nameddir4have a mode of770 - All the files in the
permissions_messdirectory that are namedfile1are readable and writable by you and the group, but not by others - All the files in the
permissions_messdirectory that are namedfile7are readable and writable by you and only readable for the group and others
Bear in mind that there are multiple copies of each file and directory hidden within the subdirectories inside permissions_mess
Hint
find can take an argument called -name and -exec. Look up how to format arguments given to the -exec sub-command! You can find (no pun intended) info in the command's manual with man find, or on the internet.
Now that we've had some practice, we can take steps to secure our home directory and shared_workdir we created earlier.
Complete
Use ls -l, chgrp and chmod as necessary to:
- change your home directory's permissions such that only you can access it
- change the permissions of
lab3_collab/your_hpc_username/such that you can enter, see the contents of, and modify the directory, and the etais organization group can enter and see the contents of the directory, but not create files or subdirectories within it - change the permissions of
lab3_collab/your_hpc_username/shared_workdir/such that only you and the etais organization group can enter the directory, list its contents and create files and subdirectories within it
Transferring data within the cluster
What we've done here is by setting the group ownership of the mentioned directories to our organization and clearing away others' permissions, we've made sure, that only us and people in our organization (who we implicitly trust) have access to directories containing potentially sensitive data.
NB In the real world, sharing sensitive data is much more restricted and can only be done with colleagues who have signed the appropriate paperwork to be in compliance with GDPR.
But for the sake of this exercise we can now, with a clear conscience, transfer our genome.fna.gz file into our shared_workdir directory and give our local colleague access to it.
Info
Rsync is an immensely useful tool for handling large amounts of data. For more info and examples, visit this link.
Complete
- Use
rsyncto copy thegenome.fnafile fromarchive_dirtoshared_workdir - Once in
shared_workdir, usechmodandchgrpto set the file's permissions such that you have read and write access, the etais organization group only has read access and no other access is given.
Tip
It is actually possible to do both of the previous tasks in one rsync command. If you feel up to it, you can search the rsync manual (accessible with man rsync) and/or the internet for a way to make rsync change a file's permissions and ownership.
With file and directory permissions set to what they should be, we are ready for next week, when we'll start running more complex jobs.
On the topic of compression
An important thing to note is the asymmetry in resource cost when considering compression and decompression. When compressing a file, the compression algorithm has to search the file for patterns that it can build a dictionary of and leverage to compress the file. More sophisticated patterns yield better compression but also take longer to find. Conversely, decompression is simply rebuilding the original file using the set of instructions that was generated during compression.
What this means in a practical sense is that if we want to optimise our time and storage space on the cluster and are dealing with data files on the scale of gigabytes, it is best to keep our files compressed. Then if we want to view the contents of those files for any reason, we can take advantage of the relative computational lightness of decompression and use tools such as zcat to output their contents to our screen. That way we avoid both creating an additional decompressed copy of our data and, in the case we didn't leave a compressed copy, having to compress it again later. We can also take advantage of the concept of "piping" one command's standard output to another command's standard input. This is done by writing the commands we wish to run in sequence and separating them with the | character. This tells your shell not to print the output of the first command to your screen, but to give it as input to the next command in the sequence. For example, to view the first 10 lines of a compressed file we would first use zcat to decompress the file to standard output and then use a pipe | to direct that output to the standard input of head, a command which by default prints the first 10 lines of a file to the screen.
On the command line it would look something like this
zcat example_compressed_file.fna.gz | head
Of course, head is not the only command that can be piped into. You can use:
tailto view the last 10 lines of a filegrepto search for an expression from the filelessto be able to view, search from, etc. the entire file
This approach leaves our big data files compressed while giving us all the necessary info we need about their contents.
This is all well and good until our own analysis workflow starts generating large amounts of data. In that case it is best to append compression of output files as the last step of your analysis workflow. Sometimes all that means is adding tar czvf archive_file.tar.gz dir_to_archive/ to the end of your job scripts. However, most of the time if a tool is built to analyze large amounts of data, it may be designed to both take compressed files directory as input and have the option of compressing its own output before writing it to file (in bioinformatics, the Burrows-Wheeler alignment tool, bwa is one such piece of kit). It is best to be on the lookout for such options.
If one needs to compress large amounts of data, it is best to submit it as a job to the cluster and not do it directly on the login-node. In general a rule of thumb is that if a tool takes longer to run that two minutes, it should be made a job and submitted to the cluster as such.
Remember:
- We want to use as little storage space as possible - what has been decompressed must be recompressed
- Compression takes comparatively long and is resource intensive
- There are tools for viewing the contents of compressed files
- In fields that deal with large data files, there are tools that can take compressed files as input and deliver compressed files as output
- Apply these rules to files on the scale on hundreds of megabytes. There is no need to worry about compressing a 4 kB Python script.