Lab 5 - HPC Center services
Overview
- Jupyter
- RStudio
Jupyter
What is Jupyter? How to gain access?
Danger
To log into ondemand.hpc.ut.ee use ETAIS LOGIN as your course account is tied to ETAIS.
Jupyter is a web-based interactive computational environment for creating notebook documents. It is a powerful tool that allows you to visualize your code, run it in blocks and see the results all in the same place. Jupyterlab and Jupyter notebooks allow you to run blocks in R alongside Python and support separating environments via kernels.
If you're a UT user, you get access to Jupyter via ondemand.hpc.ut.ee when you have access to the HPC cluster. Jupyter Notebook only offers a very simple interface. Users can open notebooks, terminals, and text files. Although Jupyter Notebook doesn't have all the functionalities of JupyterLab, it is enough for the purposes of this lab and for the introduction into Jupyter.
Jupyter architecture
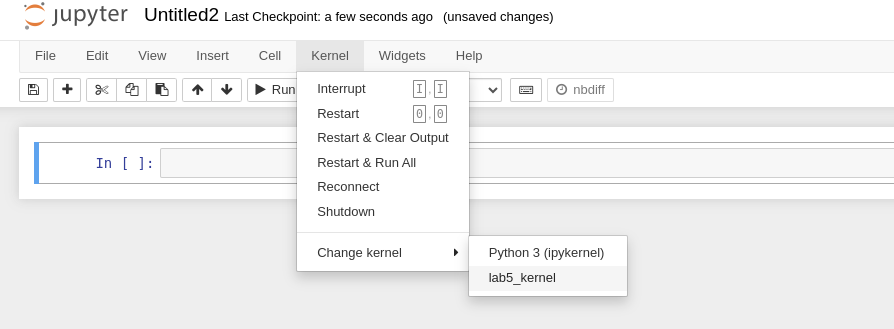
When starting the Jupyter instance, you are presented with a web page, where you select what you want to run. You have the option of running terminals in either bash or python, viewing and editing files and running a kernel. A kernel is an execution environment, that defines the context that your notebook runs in. The kernels usually refer to a virtual environment, one of which we are going to create in this lab.
As for Jupyter Notebook, it is run within a batch job on the compute node. The user will then be able to launch a Jupyter Notebook Server from the Open Ondemand interface.
Complete
- Begin by accessing ondemand.hpc.ut.ee and initiating a Jupyter Notebook server. Set
Workdirto/gpfs/space/projects/hpc-course/<your_etais_username>and set 2 cores and 8 GB of memory. Leave the virtual environment path empty. - Create a new directory
lab5in your project working directory. Hint: use Jupyter Terminal for that - Create a new notebook using Python.
- In the notebook, compose a straightforward Python script that outputs
Hello, JupyterLab!. - Don't forget to save your notebook with the filename
jupyter_lab5.ipynbto thelab5directory.
Creating Custom Python Environments
If you have your own Conda or Python environment that you'd like to use within JupyterLab, you're in for an interesting adventure of creating a custom IPython kernel, particularly when it comes to customizing it to fit your needs.
Complete
-
Set up a Conda or Python environment within your user $HOME directory on the cluster following these steps in the Jupyter Terminal:
- Begin by loading the
any/python/3.9.9module. - Create a Python environment named
lab5envby executing the command:virtualenv lab5env. - Remove the module to ensure you're using the newly created Python environment.
- Activate your freshly installed Python environment using the command:
source lab5env/bin/activate.
- Begin by loading the
-
Next, install the ipykernel package using
pip, and then utilize the provided command to connect this installed ipykernel with your environment. -
Execute the following command:
python -m ipykernel install --user --name=lab5_kernel. At the end of the long output the installation produces Installed kernelspec lab5_kernel in<path>line. -
Copy
kernel.jsonfile in the installed kernel path to the HPC course directory andlab5folder. -
Install the
scrapypackage into your environment usingpip. -
Open Jupyter, launch your server, load the kernel, and confirm that
scrapyhas been successfully installed by running import scrapy. Ifimportfunction, doesn't produce output that means it worked. Also, you can run the same command under default Python kernel that should produce an errorNo module named "scrapy"
Note
If you are an AI enthusiast looking to utilize GPUs with packages like PyTorch or TensorFlow, additional steps are necessary to set up the CUDA driver path for the kernel. You can find detailed instructions in the Jupyter User Manual.
RStudio
What is RStudio and How to Gain Access?
Danger
To log into ondemand.hpc.ut.ee use ETAIS LOGIN as your course account is tied to ETAIS.
Access RStudio at ondemand.hpc.ut.ee. Start a RStudio app. RStudio serves as a compact development environment, offering a user-friendly interface for coding and light testing. It closely resembles the RStudio environment you may typically use on your laptop.
Common Errors and Troubleshooting
A problem that often affects RStudio users is the user state directory located at ~/.rstudio becoming filled. In our experience, if this directory approaches 5 GB in size, RStudio may become sluggish or even freeze during login. If you plan to use RStudio for your studies or research, please keep in mind that the only solution in both cases is to contact us by writing an email to support@hpc.ut.ee.
Running R Code on the HPC Cluster using Slurm Jobs
To run R code outside development environment, we encourage you to use the computational power of the HPC cluster, Slurm jobs can be employed. This is particularly useful when dealing with computationally intensive R scripts or analyses that require significant resources.
Here's a step-by-step guide to running your R code using Slurm jobs:
-
Create a Slurm Script: Start by creating a Slurm script (for example,
my_r_job.slurm) that outlines the resources your job needs, such as the number of CPUs, memory, and estimated runtime. Specify the R script you want to run within the script as well. -
Submit the Job: Use the
sbatchcommand to submit your Slurm script to the cluster. For instance:sbatch my_r_job.slurm -
Monitor Job Progress: After submission, you can monitor the status of your job using
squeue -u your_username. This will show you the queue status, job ID, and other relevant information. -
Retrieve Results: Once the job completes, the results (output/error logs in
slurm-*******.out) will be generated. You can then access these files to analyze the outcomes of your R script.
A sample Slurm script (my_r_job.slurm) to run an R script named my_analysis.R might look like this:
#!/bin/bash
#SBATCH --job-name=my_r_job
#SBATCH --ntasks=1
#SBATCH --cpus-per-task=1
#SBATCH --mem=1G
#SBATCH --time=2:00:00

module load r/4.1.3
module load r-bench/1.1.3
module load r-pillar/1.9.0
Rscript my_analysis.R
Using Slurm jobs not only optimizes the utilization of cluster resources but also allows you to run multiple tasks in parallel, saving you valuable time during your data analysis or simulations.
Please tailor this script according to your specific requirements. This approach not only optimizes resource utilization by the job but also allows you to run multiple tasks in parallel, saving you valuable time during data analysis or simulations.
R tasks
Let's compare the computational performance of basic mathematical functions between RStudio and running a job on the cluster. To facilitate this comparison, we'll utilize the R library 'bench' for benchmarking. This package employs a high-precision timer, allowing us to compare the execution time of operations that are nearly instantaneous.
Here is the R code for running example calculations and benchmarking their runtime.
library("bench") # loads bench library

x <- runif(100) # creates input vector
lb <- bench::mark(
    sqrt(x),
    x ^ 0.5,
    x ^ (1/2),
    exp(log(x) / 2)
)
lb[c("expression","total_time")] # prints only two essential columns for our test
Complete
Your task is to observe difference in computational time between RStudio and a Slurm job.
- Log in to OpenOndemand at ondemand.hpc.ut.ee and start a RStudio server with 2 cores and 8 GB of memory.
- Run the calculations in the GUI. When you run the same analysis in RStudio you need to install the bench package for your RStudio server instance beforehand. Use the command
install.packages("bench"). - Utilize knowledge from previous labs and the guide mentioned in this link to script an sbatch job for running the same benchmark. When running a Slurm job on the cluster save the R code as
my_analysis.R. The R bench package will be loaded in the Slurm job with the commandmodule load r-bench/1.1.3. - Compare the results from both RStudio and the Slurm job.
- Save the total time of the best-performing approach in a file named
r_benchmarkingwithin your HPC course project directory inlab5. Use a variabletotal_timeto define the time value in the file.