Access with SSH
Secure Shell (SSH) is the main command-line remote login tool in the Linux world. All UTHPC command-line based services provide SSH access for users.
Starting to use SSH requires three main steps:
- Verifying that an SSH client is installed on your computer.
- Creating a public and private SSH key pair.
- Using the client to connect to a remote SSH server.
The most recent versions of both Windows 10 and Windows 11 include a native SSH server and client, utilizing the OpenSSH framework, which facilitates remote sign-ins using the SSH protocol.
Verify OpenSSH Installation
Ensure that the OpenSSH client feature is installed on your Windows machine. If not, you can add it through the Windows Features menu.
- Open the 'Settings' app.
- Go to 'Apps' and then 'Optional Features'.
- Look for 'OpenSSH Client' in the list. If it's not installed, click 'Add a feature' and select 'OpenSSH Client'. Click 'Install'.
Generating an SSH key pair
For added security and convenience, you can set up SSH key authentication.
-
Generate an SSH key pair using the
ssh-keygencommandssh-keygen -t ed25519- When prompted to choose the location to store the key, it is recommended to use the default location (typically
C:\Users\<username>\.ssh\id_ed25519). -
When prompted to enter a passphrase, you may consider entering one for stronger security, but it is also OK to leave it empty.
Please check your institute’s policies, as the use of a passphrase may be mandatory. If you use a passphrase, it should be different from the password you use to log in to your ut.ee account and the UTHPC server.
- When prompted to choose the location to store the key, it is recommended to use the default location (typically
-
After generating the keys, you will find two files in your .ssh directory:
id_ed25519andid_ed25519.pub. The.pubfile is your public key and the other file without extension is your private key:Mode LastWriteTime Length Name ---- ------------- ------ ---- -a---- 21/12/2023 2:55 PM 464 id_ed25519 -a---- 21/12/2023 2:55 PM 103 id_ed25519.pub -
To use the SSH key that was created above, the content of the public key needs to be placed on the server into a text file
~/.ssh/authorized_keys. Copy the contents ofid_ed25519.pub. In Command Prompt, you can usemore <path to file>, and in PowerShell, you can usecat <path to file>to view the file's contents.
How to SSH into the Server
To SSH into a remote server, use the ssh command followed by the server's IP address or domain name and your username:
ssh username@server_ip_or_domain
username with your username on the remote server and server_ip_or_domain with the actual IP address or domain name of the server you want to connect to. You may be prompted to enter your password. Once you provide the correct credentials, you'll be connected to the remote server.
Verifying OpenSSH Installation
When using WSL, you do not need to verify or install a separate SSH client, as OpenSSH is included in standard Linux distributions such as Ubuntu.
Installing WSL
Check System Requirements
Ensure you have Windows 10 or a more recent version of Windows. If you are using an older Windows version please see the manual install page.
Installation
- Open PowerShell or Windows Command Prompt in administrator mode by right-clicking and selecting
Run as administrator.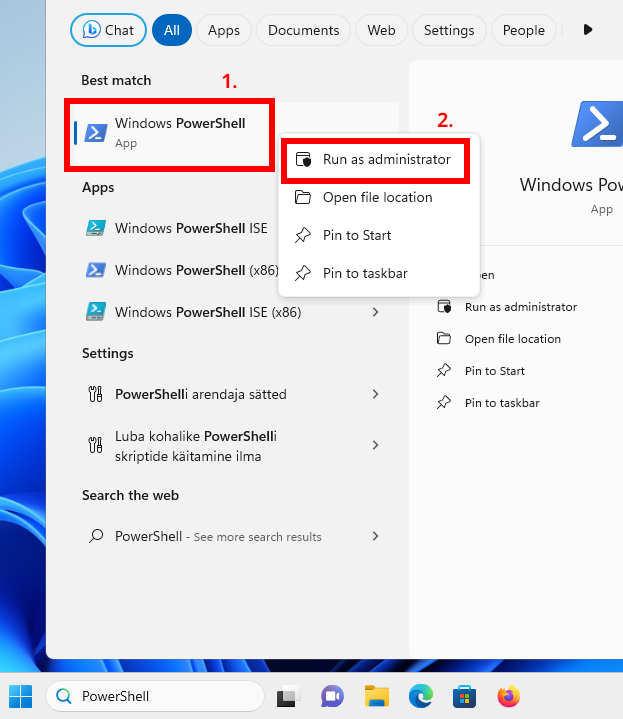
- Enter the command
wsl --install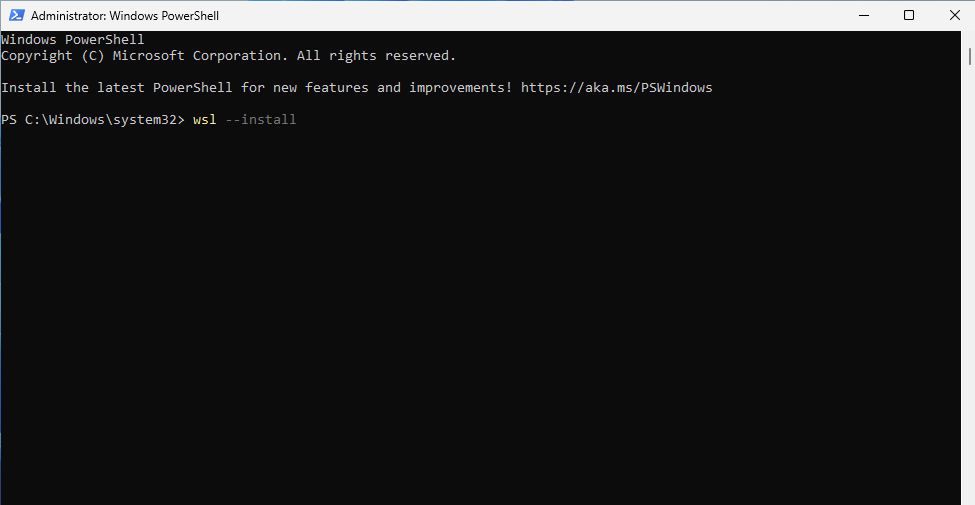
- Restart your machine.
- After the restart a window titled "ubuntu" should open automatically.
- Enter your preferred username and password.
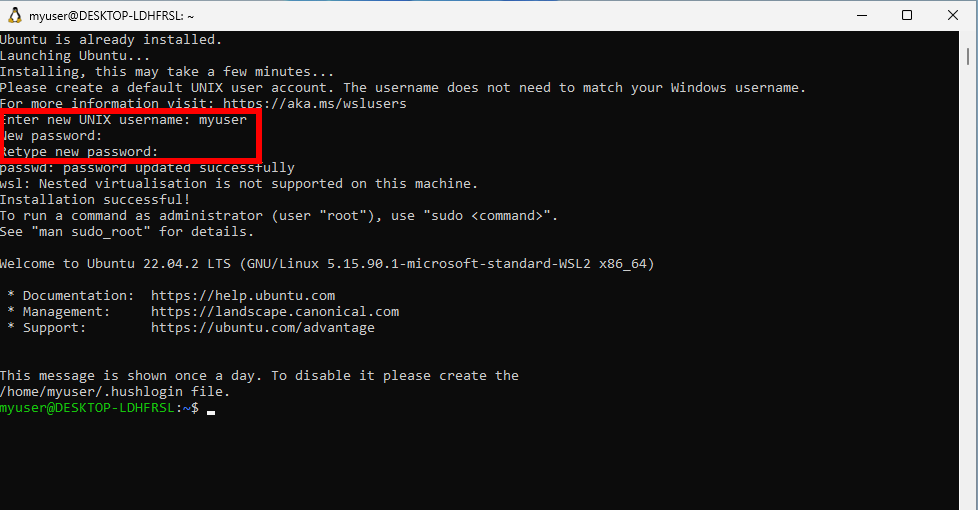
Info
Password characters will not be visible for security reasons. Dont worry, they are there.
Update and Upgrade
After setting up your user, it's a good practice to update the package list and upgrade installed packages:
sudo apt update && sudo apt upgrade
Changing the default Linux distribution installed
By default, the installed Linux distribution will be Ubuntu. This can be changed using the -d flag. To change the distribution installed enter: wsl --install -d <Distribution Name>. (Replace <Distribution Name> with the name of the distribution you would like to install.)
To see a list of available Linux distributions available for download through the online store, enter: wsl --list --online or wsl -l -o. To install additional Linux distributions after the initial install, you may also use the command: wsl --install -d <Distribution Name>.
Generating an SSH pair
In your WSL terminal, generate an SSH key pair:
ssh-keygen -t ed25519
When prompted for the file location, it is recommended to use the default:
/home/<username>/.ssh/id_ed25519
When prompted to enter a passphrase, you may choose to set one for additional security, or leave it empty.
Note
Please check your institute’s policies, as the use of a passphrase may be mandatory. If you set a passphrase, it should be different from the password you use to log in to your ut.ee account and the UTHPC server.
After generating the keys, you will find two files in your ~/.ssh directory:
id_ed25519(private key)id_ed25519.pub(public key)
You can view your public key with:
cat ~/.ssh/id_ed25519.pub
Using WSL to SSH into a Server
Open WSL
You can open WSL by searching for the Linux distribution you installed (e.g., "Ubuntu") in the Start menu or running wsl from the Command Prompt or PowerShell.
SSH into the Server
To SSH into a remote server, use the ssh command followed by the server's IP address or domain name and your username:
ssh username@server_ip_or_domain
Replace username with your username on the remote server and server_ip_or_domain with the actual IP address or domain name of the server you want to connect to.
You may be prompted to enter your password. Once you provide the correct credentials, you'll be connected to the remote server.
Now, you should be able to use WSL to SSH into a server running Linux. Make sure you have the necessary permissions and credentials to access the remote server.
Getting PuTTY and PuTTYgen
Download PuTTY from www.putty.org .
It's enough to download and install PuTTY, since it comes bundled with PuTTYgen. After installing PuTTY, you can search for PuTTY and PuTTYgen on your computer.
Basic PuTTY usage
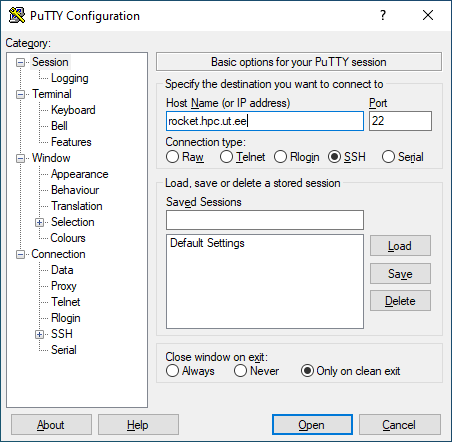
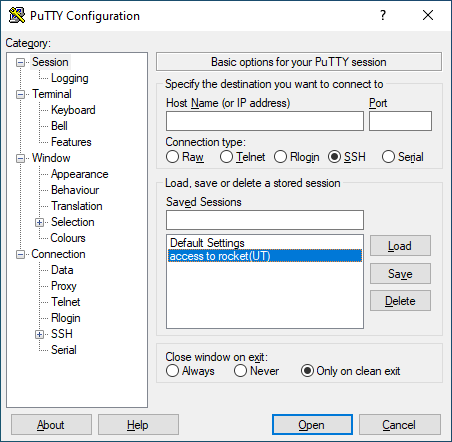
Enter the IP address of the machine you are trying to connect to in the 'Host Name (or IP address)' field. When the machine in use has a resolvable name in a DNS server available to the world, you can also use the fully qualified domain name (FQDN) instead.
In the adjacent field, specify the port your destination machine is expecting the SSH connection on. In a standard setup, the port number is 22.

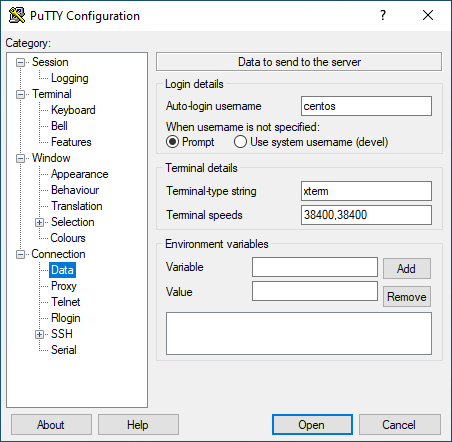
Accessing a machine with SSH requires specifying the username with which you can access the machine. You can automate the insertion of the username by choosing the 'Data' tab in the left menu and specifying the username you wish to use for the automatic username insertion. In the following illustration, the username for the 'Auto-login username' is centos.
In general, the machines available through University of Tartu ETAIS interface have the default usernames:
- Ubuntu-based image's default user is
ubuntu - Debian-based image's default user is
debian - CentOS-based image's default user is
centos - Windows-based image's default user is
Admin - typically your university (or ETAIS ) username for non-OpenStack machines.
After entering the desired username, click 'Open' to connect to the machine.
In order to save said username, go back to the 'Session' tab on the left-hand side, make sure the 'Host Name (or IP address)' and 'Port' are correct, enter a meaningful name in the 'Saved Sessions' field, and then click 'Save' on the right-hand side. The session parameters are now saved for future use.


When you later return to PuTTY, you don't have to enter the username again in the 'Data' tab on the left-hand side. Simply choose the previously saved session from the list (in the example below that would be 'access to rocket (UT)'), press 'Load', and then press 'Open'. PuTTY will create a new session with all parameters already set.
Generating public and private keys with PuTTYgen
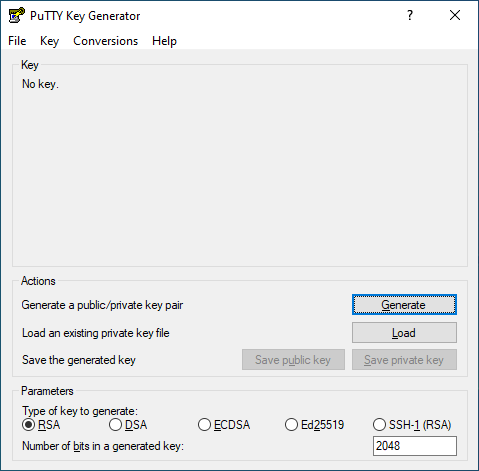
Open PuTTYgen and click 'Generate'.
PuTTYgen instructs you to move your mouse around in the white box to generate the key pair. After the generation, PuTTYgen displays the pre-selected Public key in OpenSSH format. Copy the selection into a file. Using Notepad to save the public key is fine, the file format isn't important as long as the content of the public key stays intact.
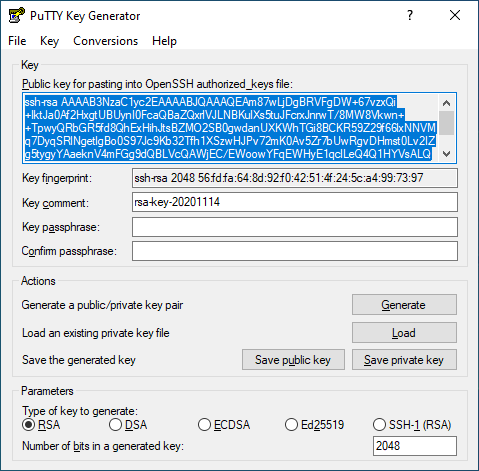
After saving the public key, you also need to save the private key by clicking on the 'Save private key' button.

After clicking the 'Save private key' button, choose the location for the private key. The private key is the most important part of the public-private key pair, and keeping it secure is of the utmost importance. The private key is saved with the .ppk file extension, which is suitable for PuTTY.
To summarize the creation of public-private key pair, the public key is in OpenSSH format and the private key is in PuTTY format.
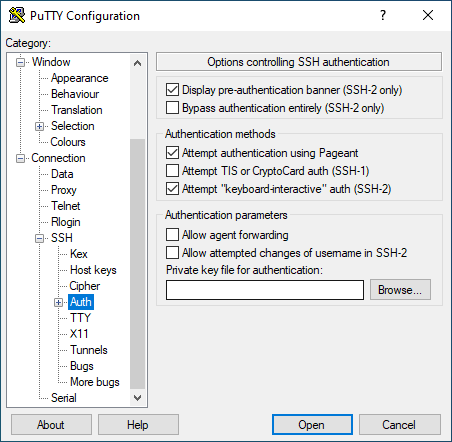
To fully automate logging into a machine, load a previously created session, go to the 'Auth' tab on the left-hand side, and click 'Browse'. Locate the previously saved private key with the '.ppk' file format and choose 'Open'.
Now go back to the 'Session' tab on the left-hand side and click the 'Save' button again. The saved session now uses the previously designated username, host, correct port, and the specified private key, granting you access to the desired machine with minimal effort. This implies that the OpenSSH-format public key has already been appended to the desired host, usually into ~/.ssh/authorized_keys file, or, in the case of ETAIS , added the public key under the SSH keys section in ETAIS .
Copy Your Public Key to the Remote Server
On the remote server, accessed from the local client, follow these steps to add your public key:
-
Connect to the remote Linux server using the SSH client of your choice (PowerShell, WSL, or PuTTY) and log in. NB! You can only SSH into
rocket.hpc.ut.eefrom within the university network or via the University of Tartu VPN. -
Create a directory named
~/.sshusing the command:mkdir ~/.ssh -
Set appropriate permissions for the
.sshdirectory with the command:This grants the user (owner) read, write, and execute permissions.chmod 700 ~/.ssh -
Create an empty text file named
authorized_keysusing the command:Paste the contents of the "Public key for pasting into OpenSSH authorized_keys file" into the text file. Confirm that the key is pasted correctly. Save and close the file.nano ~/.ssh/authorized_keys -
Secure the permissions of the
authorized_keysfile:This setting provides the user with read and write permissions on thechmod 600 ~/.ssh/authorized_keysauthorized_keysfile. -
Exit the SSH connection:
This closes the SSH connection.exit -
Attempt to log in using the SSH key:
Ensure that you can log in without being prompted for a password. However, if you set a passphrase for your SSH key, you will still need to enter the passphrase.ssh your_username@server_ip_or_domain
By following these steps, you have securely added your public key to the remote server, allowing passwordless authentication using SSH keys.
Security
If your account password has been compromised, please do the following:
- Change your password immediately.
- Generate new SSH keys.
- Remove any old SSH keys from the server to prevent unauthorized access.
Taking these steps will help secure your account and protect your data.