OpenStack
You launching a live server, which is most probably connected to a network, so a little planning is definitely useful. If you just need a machine to test your web-based app or a place to run your command line tools, the defaults should be 'OK'. If you need multiple instances or unusual ports, contact support@hpc.ut.ee before beginning, unless you really know what you are doing.
Logging into the cloud
The cloud URL is https://cloud.ut.ee . To get access, start a new project or gain access to an existing one please contact UTHPC support by emailing support@hpc.ut.ee .
Log in with your UT credentials, the domain name is ut.ee.
In case you would prefer to use the self-service minu.etais.ee , please ask your Project Lead to invite you to the project or request minu.etais.ee access here .
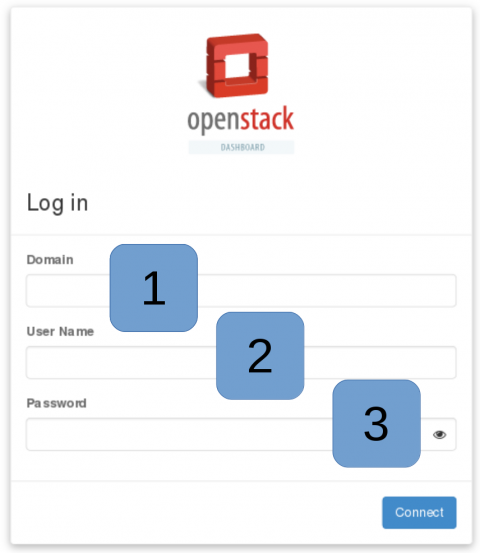
- If using University's central username and password, use
ut.eeas the domain. - University central user name if domain is ’ut.ee’.
- University central password if domain is ’ut.ee’.
Starting a new instance
Choose ’Instances’ from the left-hand menu and click the ’Launch Instance’ button.
On every page there is a small help icon with ?-sign that provides you with further information about the available options.
Details
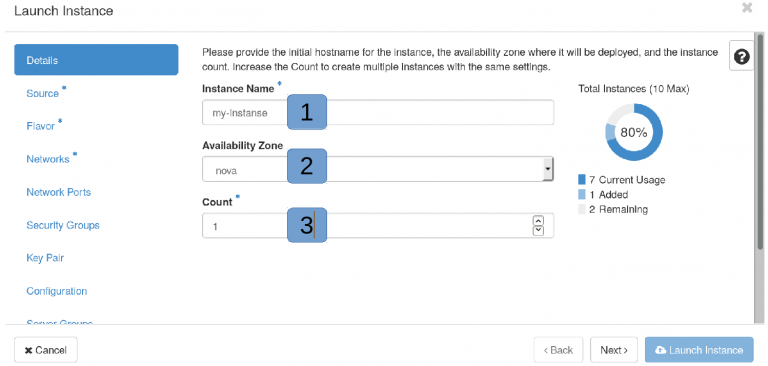
- Instance name without dots or non-ASCII chars.
cloud.ut.eeis automatically added. - Availability zone – only one zone available anyway.
- How many instances to create.
From now on, you don't have to fill all values, but a few are critical. The default values are usually 'OK'.
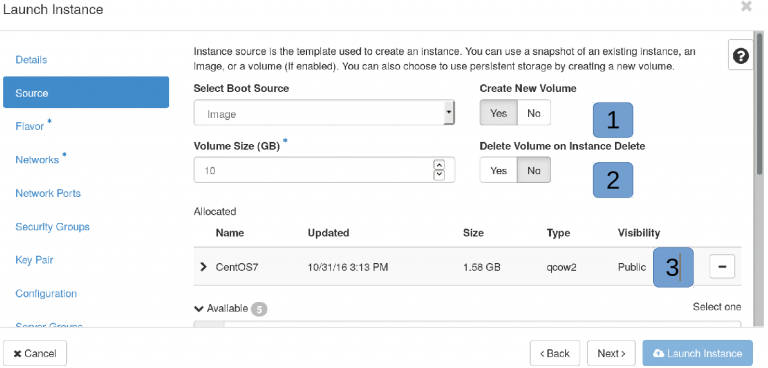
Source
Choose the boot source. If you select ’Image’ then you can choose several Linuxes, BSD, and Windows Images. Otherwise – it depends.
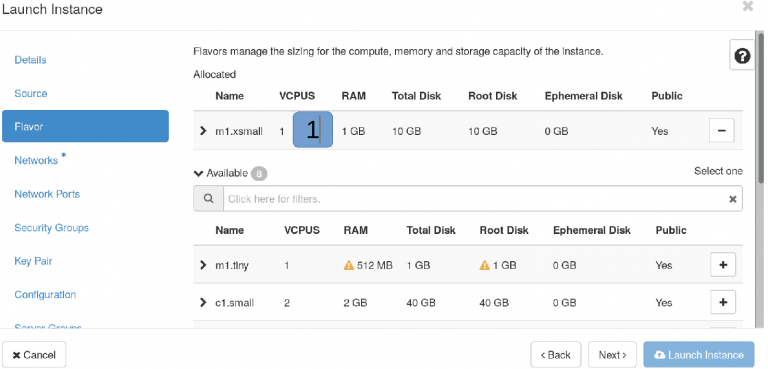
Flavor
Flavors are features for virtual machine (RAM,CPU/GPU storage etc.) Getting GPU's requires access to GPU flavors.
Flavors define underlying hardware size and type. Flavors are mostly formatted as follows type<generation>.label
Use the highest generation of hardware when possible. It's faster and the price is the same.
- g5 RECOMMENDED, hardware from 2026, which is approximately 20% faster than the fourth generation.
- g4 RECOMMENDED, hardware from 2025, which is approximately 37% faster than the third generation.
- g3 DEPRECATED, hardware from 2020, which is approximately 25% faster than the second generation.
- g2 DEPRECATED, hardware from 2018, which is approximately 35% faster than the first generation.
- g1 REMOVED, hardware from 2013, change existing VM flavour or accept hardware failures!
GPU – flavor with appropriate GPU accelerator.
Resizing ’normal’ virtual machines without PCI passthrough (GPU) works fine on Linux VM's for example moving back-and-forth between flavors to keep cost down.
Networks
Networks – for network access
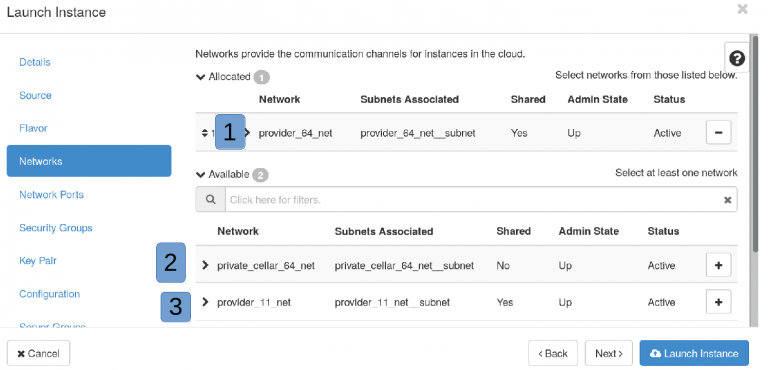
- University internal network
provider_88– is accessible only from internal University networks or VPN, no firewall in-house, except for the security rules you define in the UI and inside the machine. - Network inside of cloud. You can add floating IP from provider network to make it available from outside.
- Network accessible from the outside world publicly -
provider_11,provider_33,provider_153,provider_154. TCP ports 22, 80, 443, and ICMP are public by default. You must enable those also in your security group if needed. If there is a need for other ports, you must ask the UTHPC team to open them. Also, please think whether you really need your machine to be accessible for the whole world before using a public address. - public_ipv6_net – this one is public /64 ipv6 network range only for you project. You must use dualstack IPv4 and IPV6 networks because metadata (your ssh keys, hostname etc) is IPv4 only.
Info
If you need *.[hpc.]ut.ee DNS then launch your instance into private network and allocate ’Floating IP’ from appropriate provider network. For that please see ’Network Topology’ tab. Then send allocated IP together with required name to support@hpc.ut.ee . By default you get automatically <instance_name>.cloud.ut.ee if the name is already not taken.
There are daily hacking tries against machines in public networks, sometimes with success. Make sure you have:
- turned off password authentication,
- applied tight firewall policy,
- installed software from trusted sources.
Warning
Compromised machines are instantly shut off.
Network ports
No need to add any. Please just move on by clicking ’Next’.
Security groups
Here you can configure firewall rules.
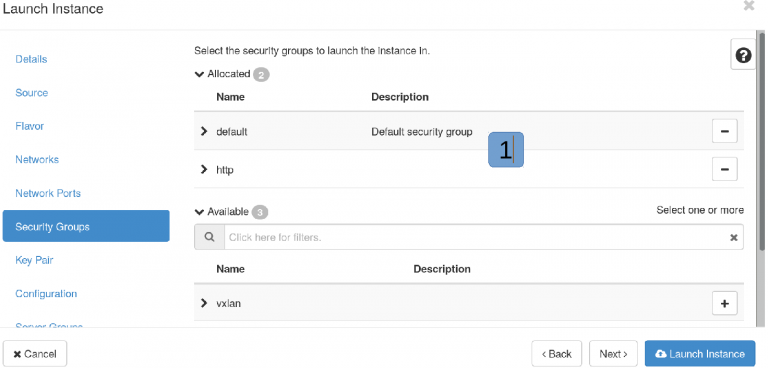
- Predefined firewall rules – you can choose zero or many. Make tight rules if you are using public network segment. Also, you can not mix instance wide rules and port specific rules. It's needed to choose one approach or another. If needed create a new group, for example HTTP and allow ingress TCP 80 and 443.
Key pair
You definitely need a key pair to access your instance – in fact it's the only way to get in.
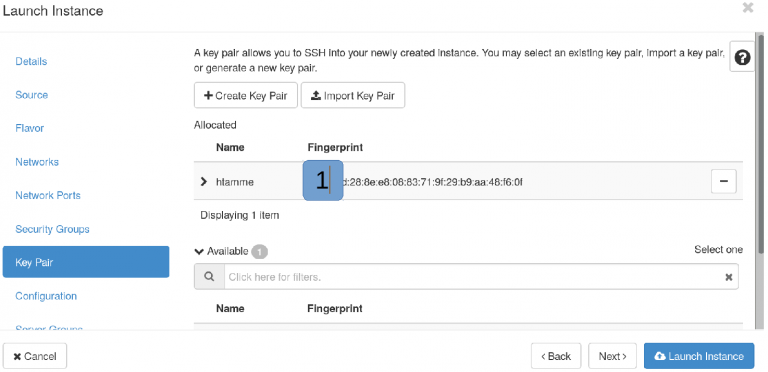
- Hit ’Create Key Pair’ button and follow instructions.
You need RSA public/private key pair. Please save your private key and keep it safe. Your private key is only loaded on first boot. You can add extra keys manually by modifying ~/.ssh/authorized_keys file.
Now you can click ’Launch Instance’.
Access your server
Sooner or later you need web console access because the machine won't boot or networking is down etc. Local user password is only for web console and not for SSH. SSH with password is by default turned off. Adding password for local user still means that SSH password authentication is still turned off. Web console is black area below:
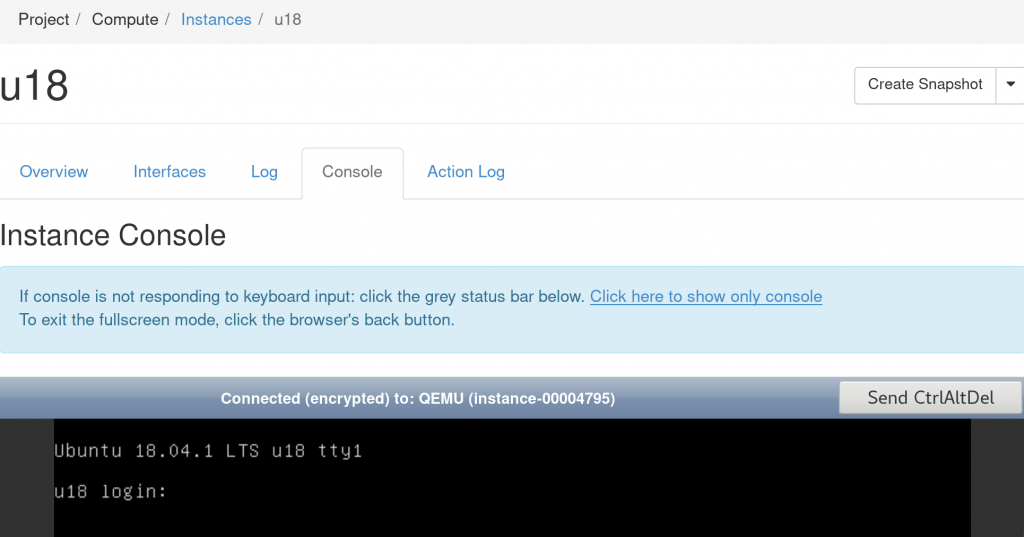
Should you need help with the basics, for example how to set up SSH connection, please refer to the SSH manual .
Please keep in mind
- Ubuntu-based image default user is
ubuntu, - Debian-based image default user is
debian, - CentOS-based image default user is
centos, - Flatcar-based image default user is
core, - Rocky-based image default user is
rocky,
You can always define your private network and associate floating IP from provider network. This is a recommended way to use persistent IP's. There must be a virtual router between provider and private network. You can define it. If you want some resolvable host name, then you need persistent IP.
Private overlay network expected speed inside cloud is at least 1 Gb/s. Provider network expected speed is 3-20 Gb/s, but it depends of flavor generation and network setup.
OpenStack firewall concept name is ’security group’. You must review/create rules if you need some extra port/protocol enabled. You can apply many security group rules to VM.
Available images
centos9- CentOS Stream with watchdog device.rocky10- Rocky Linux 10.flatcar- Flatcar Container Linux.ubuntu24.04– Ubuntu 24.04 LTS (Noble Numbat) with watchdog device.debian13– Debian 12 (Trixie) with watchdog device.
Creating your own image based on previous images are also possible and probably the easiest way to bake your passwords or special "whatever" in. Those images are by default private and only visible within your project. Ubuntu 24.04, Debian 13, CentOS Stream 9 and Rocky10 also has a watchdog device '/dev/watchdog'. You can add your own custom monitoring scripts to '/etc/watchdog.d/'
Docker installation inside VM
Please avoid docker default bridge docker0 network 172.17.0.0/16. This network is already taken and you lose your connection as soon as bridge is coming up.
You can run command ip route get your_laptop_ip to predict if you are loosing connectivity when docker is coming up. If Your IP is within docker0 range you loose connectivity. Please make sure that you have local sudo user with password. This makes web console usable.
To understand how to setup Docker so that your network is fully functional, please see the setting up docker in ETAIS page
Command-line
- Launch instance from image named
openstackclient-major-minor. - Via web interface push following button. V3 is a good option.
Compute->Access and Security->API access->Download OpenStack RC.- And source downloaded file inside launched instance.
GPU
Available models are: ’B200’, ’L40S’, ’A100’, ’P100’, ’V100’.
VMs with GPUs are hard-wired with a hypervisor where they're initially booted. If the hypervisor malfunctions, then your VM with a GPU will be inaccessible.
Object storage
S3 and Swift API on top of 'prod3' storage backend. The cloud URL is https://object.cloud.ut.ee
- get
openrc(OpenStack RC) and source your environment - run command
openstack --os-interface public ec2 credentials create - install boto3
- use API endpoint
Backup
prod3storage type – weekly tape backup, snapshots and volumes. Running VM backup may be inconsistent.
Storage performance
Performance depends of disk capacity. Bigger disks are faster. Roughly 1 TiB disk characteristics are below:
prod3type storage (IOPS intensive SSD):- 1.5 GB/s, after 30 seconds limited to 600 MB/s
- 20000 IOPS, after 30 seconds limited 10000 IOPS
E-mail
193.40.11.0/24, 193.40.33.0/24, 193.40.153.0/24, 193.40.154.0/23 relayhost is mx.cloud.ut.ee. Message transfer agent (MTA), is rate limited.